So, you’ve got a legacy system and have decided to make the smart move of embracing domain driven design. To this end, you’ve decided to introduce Entity Framework into your system in order to facilitate expressing your domain in an ubiquitous language. You are clearly very smart because you’ve also decided to use the code-first approach which is the ideal methodology for doing test driven design.
If your existing system is quite large, then the prospect of hand coding all the entities that already exist in your database might seem a bit of a tedious task. Reverse engineering however is a great way to save time. Don’t get me wrong, I am not suggesting throwing away all of the good stuff like TDD or DDD. All I’m saying is minimize menial labour by quickly generating the entities that you want to start with and then expand on them through TDD and DDD.
For this purpose, the Entity Framework team created a handy little tool called “Entity Framework Power Tools”. The tool is still in Beta as we speak but already showing a lot of promise. It gives you control over the code that is generated meaning that if you want to customise the code that is produced (to meet with your company’s standards), you are then able to edit the T4 templates used for code generation. Sadly it’s missing the feature enabling you to select only the specific tables you want to reverse engineer, but we forgive this little fault considering what it has saved us on labour.
A Demonstration
In demonstrating this tool, please note that it is assumed that you are already familiar with entity framework and understand how the DbContext, Entities and EntityConfiguration files work together.
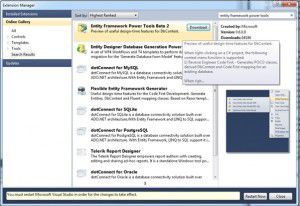
The Power Tools are installed through the Extension Manager in Visual Studio. Open Visual Studio, click on Tools and then Extension Manager. In the search bar, type “Entity Framework Power Tools”.
Using your Power Tools
Before we begin, I need to point out that the reverse engineering process will work better if you have foreign keys defined on your tables. The power tools will also be able to form more meaningful relationships between your entities if you do. If you don’t have foreign keys defined, the tool will only automatically generate the entities (with scalar properties) and not the relationships to other entities. It is therefore advisable to invest some time in setting up these foreign keys before you begin to reverse engineer. This will save you a lot more effort in the long run.
I would also suggest that you consider getting a great refactoring tool such as Resharper to speed up the refactoring of your legacy code, especially when you are creating large volumes of new code through reverse engineering.
Let’s create some tables on a database first
For the purpose of this demonstration, create the following tables on a test database that you have access to:

Now, let’s reverse engineer our tables!
- Create a new blank solution in visual studio.
- Create a Class library for your domain entities.
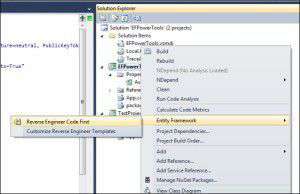
- Right-click on the class library project file; the Entity Framework menu only appears on the project sensitive menu.
- Select the “Entity Framework” menu.
- Select “Reverse Engineer Code First”
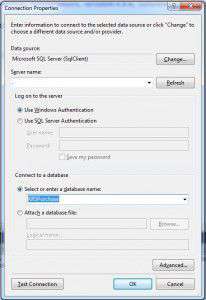
On Connection Properties, enter your connection details (I called my database KRSPurchase):
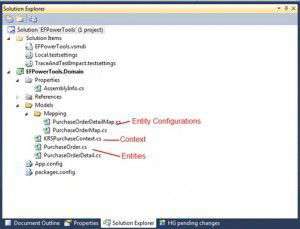
At this point the power tools will do the following:
- Create a “Models” folder.
- Create a subfolder called “Mappings”.
- Create an entity configuration file for each table that it finds.
- Create an entity for each table.
- Create a DbContext file.
- Create an app.config file with the connectionstring that you specified.